Pages

Friday, February 21, 2014

The Perfect Gift

On the way to the Leadership conference in January. While waiting in line to board my flight, the woman in front of me recognized my Stampin' Up backpack.  We immediately struck up a conversation.  On the flight, we had such a great time sharing stamping stories and ideas.  The 2 1/2 hour flight passed so quickly.

My new found friend is Sarah Naber, a demonstrator from St. Joseph, MO.  New friends is just one of the Stampin' Up perks.

I recently visited Sarah's blog where she shared a video about a cute post-it note holder.  Here is a cased version of her project.


Here is another version I did.


Card Details:

Stamp Set:  Morning Post
Paper: Version #1- Eastern Elegance,Whisper White, Crushed Curry, and Bermuda Bay.
Version #2 Watercolor Wonder, Whisper White, Calypso Coral, and Island Indigo
Ink:  Bermuda Bay or Island Indigo
Tools:  1 3/4" Scallop Circle, 1 3/8" Circle, and 1 1/4" Circle
Accessories:  Crushed Curry or Island Indigo Chevron Ribbon


Thanks for visiting!
Come back soon.
Sherrie
Pin It! Read more at http://www.kevinandamanda.com/whatsnew/tutorials/add-a-pin-it-button-to-your-posts.html#ixzz2rT1AuL9L

Thursday, February 20, 2014

Simple Stems


The Hardwood Background stamp is perfect for masculine cards but don't limit it's use.  Here it is teamed with a single flower from the Simple Stems Stamp Set.  The colors of Very Vanilla, Early Expresso, Rose Red, and Olive were used on this simple card.

Tips:
I used a sponge dauber to ink around the edges of the card front in Early Espresso.  This will add depth to the background.

The flower was stamped and then I "fussy cut" around it.  Stampin' Dimensionals were used to pop up the flower.  Again layers on your card add depth and interest.

I often use the Hexagon Punch to form banners.  Check out the sentiment banner.  Each layer was punched separately.

Card Details
Stamp Sets:  Simple Stems and Remembering Your Birthday
Paper:  Very Vanilla, Rose Red
Ink:  Early Expresso, Old Olive, Rose Red
Tool:  Hexagon Punch and Sponge Dauber
Accessories:  Basic Metal Button, Linen Thread

Thanks for visiting!
Come back soon.
Sherrie
Pin It! Read more at http://www.kevinandamanda.com/whatsnew/tutorials/add-a-pin-it-button-to-your-posts.html#ixzz2rT1AuL9L

Tuesday, February 18, 2014

Single Layer Card

A few weeks ago I ran across a challenge to make a single layer card.  It was a very difficult task for me because I love layers.  For this card, I started with a Whisper White card base which measured 8 1/2" X 5 1/2" scored at 4 1/4".  The background was made by stamping dots using a stamp from the Perfect Pennants stamp set.  The color scheme was borrowed from the Sweet Sorbet Designer Series paper (DSP):  Pool Party, Crisp Cantaloupe and Pistachio Pudding. When you are seeking color inspiration, the DSP sets are a great resource.  
The oh, HAPPY DAY sentiment is from the Starburst Sayings stamp set.  It stamped with Black Staz'On.  I love the way the background colors show through the sentiment.  Add a bit a Crisp Cantaloupe twine from the Sale-A-Bration Sweet Sorbet Accessories Pack.

BAM, a quick one layer card.


Card Details:
Stamp Set:  Starburst Sayings, Perfect Pennants
Paper:  Whisper White
Ink:  Black Staz'On, Pistachio Pudding, Pool Party, Crisp Cantaloupe
Accessories:  Crisp Cantaloupe twine


Thanks for visiting!
Come back soon.
Sherrie
Pin It! Read more at http://www.kevinandamanda.com/whatsnew/tutorials/add-a-pin-it-button-to-your-posts.html#ixzz2rT1AuL9L

Saturday, February 15, 2014

Envelope Punch Board Treat- February Stamp Club Project


I case'd this cute little treat holder from Angie Juda at Chic'n Scratch.  These treats are quick and easy, perfect for any occasion.  Wouldn't they be great for Easter or Administrative Assistants Day?


They are made from a 3" X 5" piece of card stock which is scored at 2 1/4" and 2 1/2".  The Sweet Sorbet Designer Series Paper (FREE with $50 purchase) measures 2 1/4" X 3".  Adhere the DSP to the front before using the Envelope Punch Board to form the tabs.  The Ghirardelli candy was added to the folder with glue dots.  Cord from the Sweet Sorbet Accessories Pack (FREE with $50 purchase) was wrapped around the file twice and a bow was tied.  The flower was stamped and punched using the Flower Shop and Petite Petals bundles.  Add the sweet sentiment from Teeny Tiny Wishes.  All done!

Here is a picture of my version and Angie's version.  
Can't you see the possibilities?


Thanks for visiting.
Wishing you a fabulous Saturday.
Sherrie


Pin It! Read more at http://www.kevinandamanda.com/whatsnew/tutorials/add-a-pin-it-button-to-your-posts.html#ixzz2rT1AuL9L

Wednesday, February 12, 2014

Wetlands on the Hardwood


Last week I spent two days at home - due to record snows in Kansas.  I used the time making cards and watching Season 4 of Downton Abbey.  Wonderful days!  

It was the perfect time to pull out the Wetlands Stamp Set.  This is my first card using this set. The new Hardwood stamp made the perfect background.  Add a bit of 1 1/4" Burlap ribbon and a Basic Metal button.  I love the results.


Products I used:
Stamp Sets:  Wetlands and Hardwood
Paper:  Old Olive, Very Vanilla
Ink:  Early Expresso, Old Olive, and Sahara Sand
Tools:  Sponge Daubers
Accessories:  Linen Thread, Basic Metal Button, 1 1/4" Burlap Ribbon


Thanks for visiting!
Come back soon.
Sherrie

Pin It! Read more at http://www.kevinandamanda.com/whatsnew/tutorials/add-a-pin-it-button-to-your-posts.html#ixzz2rT1AuL9L

Tuesday, February 11, 2014

Share What You Love Blog Hop


2014febhop_badge

Welcome to the Pals February Blog Hop. This month we are excited to share with you what we love about Stampin' Up! - our stamps, tools, accessories and techniques.
You may just be starting the blog hop or may have come from #11 Rae Harper-Burnet at Wild West Paper Arts on the Pals Hop. If you get off track at any time, the full lineup below will help you move along from blog to blog so you see all of the amazing creations.

What I love about Stampin’ Up? EVERYTHING! 

My answer may be simple but the reasoning behind it is more complex. I have been involved in some sort of crafting my whole life. I will be hitting another major milestone on my birthday this year. So let me assure you, it has been a good number of years.

#1 QUALITY

I began paper crafting in the mid-1990’s when I attended a workshop which featured products from another company, who will remain un-named but is no longer in business. From there I was hooked and started adding to my collection of tools, papers, accessories, etc. I tried everything and bought it all. Because I have a retailing background, I could identify product lines on sight. I even sorted and stored by supplies by product line. Weird, huh!

In 2005, I began attending a monthly Stampin’ Up club. From the first month, I was hooked. I loved the quality and the coordination of the products. Once introduced to Stampin’ Up paper, cards made with paper from other companies just did not measure up. Over time I stopped buying paper at the Big Box and local scrapbook stores for even my scrapbooking needs.

#2 COORDINATION

I have always been very particular about color coordination. I think it all began early in my life when I made all my clothes, crazy but true. This obsession continued when I learned to do decorative painting. At one time, I think I owned 150+ different colors of acrylic paint. Of course, they were sorted by color, browns, blues, greens, reds, etc.

So you can imagine I carried this tendency over to my paper crafting. I Love the way Stampin’ Up
coordinates all of their product. Gone were the days when I went from store to store to find just the right ribbon or ink. Stampin’ Up has SIMPLIFIED and IMPROVED my paper crafting.

In recent years they have taken it a step further with the addition of punches, framelits, and other tools to take coordination to another level. LOVE IT!

It is true, I am a Stampin’ Up snob.

Today, I am sharing a card we are making at my monthly card clubs.  It is a great example of the wonderful coordinating products and the innovative tools from Stampin' Up.


The Scalloped Tag Topper Punch is a brand new product from the Occasions Catalog.  There are so many unique ways to use it.  This card closure is just one example.  I used the Sweet Sorbet Designer Series Paper, which is FREE with a $50 purchase during Sale-a-bration.  The colors of Pistachio Pudding, Pool Party, and Crisp Cantaloupe coordinate with the DSP.  Each color is beautiful.  What is your favorite?

Crisp Cantaloupe version


Pistachio Pudding version


Pool Party version


Card Details

Stamp Sets:  Perfect Pennants and Happy Watercolor
Paper:  Sweet Sorbet Designer Series Paper, Whisper White, Crisp Cantaloupe, Pistachio Pudding, Pool Party, Sahara Sand.
Ink:  Sahara Sand, Crisp Cantaloupe, Pistachio Pudding, Pool Party, Black Staz'On
Tools:  Scalloped Tag Topper Punch, Arrows Impression, Scallops Textured Impression, Adorning Accents Texture folders, Fringe Scissors.
Accessories:  Sweet Sorbet Accessory Pack and Stampin' Dimensionals.

The next stop is #13 Mary Fish at Stampin' Pretty on the Pals Blog Hop! Thanks for visiting and  I hope to see you next month.


  1. Kerry Willard Bray at  Peonies and Paper Chains
  2. Brian King at Stamp with Brian
  3. Janice Warhank at  Janice's Papercraft Playground
  4. Shannon Hokanson at Paper Works
  5. Michelle Gleeson at  StampinMojo
  6. Marlene Heringer at So Many Toys So Little Time
  7. Linda Callahan at  Stampin' Seasons
  8. Katy McGloin at  Just Fun Stamping 
  9. Susan Itell at  Simple Stampin
  10. Nicole Watt at  Pixel Maven's Retreat
  11. Rae Harper-Burnet at  Wild West Paper Arts
  12. Sherrie Gross at  Stampin Sunshine
  13. Mary Fish at  Stampin' Pretty
  14. Peggy Noe at  prettypapercards.com
  15. Donna Kopenski at  craftycardmaker
  16. Maggie Mata at  Maggie Made Cards
  17. Natalie Bradley at Natalie Bradley Events
  18. Diane Roberts at  Score at Four and a Quarter
  19. Lisa Ann Bernard at  Queen B Creations
  20. Jackie Diediker at Stampin Jackie
  21. Alison Bilohlavek at ribbon and brad
  22. Kelly DeTommaso at  Kelly's Creative Corner
  23. Martie Pollard at The Crafty Bandit
  24. Angie Blake at Angie's Musings
  25. Dawn Tidd at  Tiddbits from Dawn
  26. Shirley Sumption at  Look at my Cute Stuff
  27. Debbie Mageed at Secret Stamper
Enjoy the hop!
Hope to see you soon,
Sherrie
Pin It! Read more at http://www.kevinandamanda.com/whatsnew/tutorials/add-a-pin-it-button-to-your-posts.html#ixzz2rT1AuL9L

Sunday, February 9, 2014

Stampin' Pretty Guest Stamper

I am so excited to share my project today.  It is always a thrill to be "guest stamper" for my upline Mary Fish.  Long before joining Stampin' Up as a demonstrator, I was a big Stampin' Pretty fan.  Viewing Mary's daily post was how I started every day.  Hopefully, I will be a good start to your day. 

A couple of weeks ago, I received the NEW Hexagon Hive Thinlits die as a recruiting perk from Mary.  WooHoo!  Free product is one of my favorite things about being a demonstrator.  Initially, it had not been on my list of "must haves" because there are so many great items in the NEW Occasions Catalog.  But that was before I tried it now I am addicted.
Here is my first card using the Hexagon Hive Thinlits die.  I decided to go with the look of ombre which is so popular right now - in fashion and hair color.  The Stampin' Up colors of Soft Sky, Coastal Cabana, Bermuda Bay are a great combination for this look.  The pops of Daffodil Delight are the perfect accent - so cheerful.  


Tips: 
 I began by using the die on a 4" X 5 1/4" piece of card stock in Soft Sky, Coastal Cabana, Bermuda Bay, Daffodil Delight and Whisper White.  It helps to place a piece wax paper between the die and the cardstock before running it through the Big Shot. This will prevent the cardstock from sticking in the die.  I have had more problems with the Whisper White cardstock sticking in the die than other colors which are a heavier weight.  It also helps to run the die through the Big Shot multiple times.

When using the die, there a many small pieces, so be sure to have a small container like a basket handy on your desk.  It will help with the clutter--as if anything could help me--but it will help keep track of them until you find just the right project to use them on.

Remember, the hexagons from the thinlit die will fit on the Honeycomb Texture folder too.  Don't you just love the way the Stampin' Up products coordinate!

I used a sponge dauber to add ink to each of the hexagons before adding them to the Whisper White frame-Soft Sky ink on the Soft Sky, Coastal Cabana on the Coast Cabana, Bermuda Bay on the Bermuda Bay, Daffodil Delight on Daffodil Delight.  This just adds a bit of depth to the pieces.  
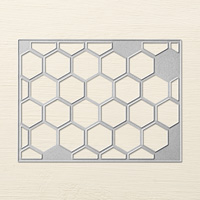
To get the look I wanted I decided to cover the entire frame with the hexagons even though the die does not cut out hexagons to cover the entire frame. Some of the colored hexagons fit into the frame and others were added on top of the Whisper White.  A few hexagons were cut down to fit in the corners.  Check out the die below.  Some parts of the frame are left solid. 


Hexagon Hive Thinlits Die


Now it was time to choose the sentiment for the card.  Because the background has a lot of detail.  I chose a simple tag made with the NEW Scalloped Tag Punch from Occasions catalog.  The watercolor stamp from the Happy Watercolor set was stamped in Daffodil Delight and Coastal Cabana.  The sentiment from the Perfect Pennants stamp set was stamped in Black Staz'On over the watercolor background. Love it!

Check out the cute detail at the bottom of the tag.  The NEW Fringe Scissors were used to cut the fringe in Daffodil Delight and Coastal Cabana.  Add a few Designer Rhinestones and ribbon to the tag. BAM!  A beautiful card to share with someone special.


Products I used:

Stamps:  Perfect Pennants and Happy Watercolor
Paper:  Whisper White, Soft Sky, Coastal Cabana, Bermuda Bay, Daffodil Delight
Ink:  Soft Sky, Coastal Cabana, Bermuda Bay, Daffodil Delight, and Black Staz'On
Tools:  Hexagon Hive Thinlits die, Scalloped Tag Punch, and Fringe Scissors
Accessories:  Crushed Curry Chevron Ribbon, Bermuda Bay 1/8" Taffeta Ribbon, Designer Rhinestones, and Stampin' Dimensionals.

I love hearing from you so please leave a comment. 


Thanks for visiting! 
Come back soon. 
Sherrie


Pin It! Read more at http://www.kevinandamanda.com/whatsnew/tutorials/add-a-pin-it-button-to-your-posts.html#ixzz2rT1AuL9L

Saturday, February 8, 2014

Paper Pal Arts Color Challenge - PPA190


This week's color challenge is a combination of sweet and seasonally appropriate colors to play with for the first color challenge of February:  Blushing Bride, Rose Red and Basic Gray.  Don't these colors work well for any occasion not just Valentine's Day.
PPA190 Feb 6


WOW!  This is such a great color palette to work with.  Unfortunately, I have been neglecting Rose Red and Blushing Bride recently.  I am not sure why.  Thank you PPA Design Team for reminding me just how great they are.


Tips:

Check out the cut arrows and the flower from the Petal Parade Stamp set- FREE with a $50 order during Sale-a-Bration.  The arrows were stamped randomly in Basic Gray, Blushing Bride and Rose Red.  I really love the way the stamp and the arrow texture compliment each other.

I did not use the Stamp-a-ma-jig because they are so easy to place when using the clear mount stamp.  But if you prefer wood mount stamps I would recommend using one for perfect placement.  Just remember to rotate your spacing and colors.

The Blushing Bride flower is the perfect background for the "your make me HAPPY" sentiment from the Happy Watercolor stamp set.  I have been using this set a lot lately.

Products I used:
Stamp Sets:  Happy Watercolor and Petal Parade
Paper:  Whisper White, Basic Gray, Rose Red
Ink:  Basic Gray, Rose Red, and Blushing Bride
Tools:  Arrows Impression Texture Folder
Accessories:  Designer Rhinestones and Stampin' Dimensionals

Thanks for visiting!
Come back soon.
Sherrie
Pin It! Read more at http://www.kevinandamanda.com/whatsnew/tutorials/add-a-pin-it-button-to-your-posts.html#ixzz2rT1AuL9L

Friday, February 7, 2014

Good As Gold Card Kit - A Winner!!

Sale-a-bration has always been my favorite time of the Stampin' Up year.  This year is no exception.  I have to confess I have already gotten most of the "free" items from the brochure.  The Good As Gold card kit was not high on my list.  But I was wrong.  .  .  .  The polka dots on the note cards are  Bermuda Bay and Tangerine Tango with gold accents.  Love it!  It comes with a variety of die-cut tags in English, French and German.  The Sahara Sand envelopes are so pretty with the gold foil liners.  These cards are quick and easy but so striking.  They can be made in the portrait or landscape orientation--both are beautiful. 


I made 6 cards from the kit using a variety of the die-cut tags. 
See below.


I used the remaining 2 note
cards to make scallop topper treat holders, which I CASE'd from Dawn Griffith's blog.
I have made these treat holders using solid cardstock or the Fresh Prints paper stack.  They are quick, easy, and oh so cute. 


Details:
Good As Gold Card Kit
Paper:  Whisper White and Gold Foil
Ink:  Tangerine Tango and Bermuda Bay
Tools:  Petite Pennants Builder Punch

Remember, this card kit is free with a $50 order during Sale-a-brations, January 28th through March 31st.  I will be getting more of these card sets.  To shop now, go to my online store

Thanks for visiting! 
Come back soon. 
Sherrie
Pin It! Read more at http://www.kevinandamanda.com/whatsnew/tutorials/add-a-pin-it-button-to-your-posts.html#ixzz2rT1AuL9L

Thursday, February 6, 2014

Just Sayin' Birthday Card

 Today's card features several products from the Occasions Catalog and a the fabulous Banner Punch from the Sale-a-brations promotion.  This cute little banner punch is free with a $50 order during Sale-a-bration but it will be in our next Annual Catalog too. Woohoo!
The Kaleidoscope Designer Series Paper features geometric patterns and a beautiful palette of Basic Black, Bermuda Bay, and Crushed Curry.  Love it!!


The card front is a standard 8 1/2" X 5 1/2" piece of Basic Black scored at 4 1/4".  I used a 4" X 5 1/4" piece of black and white DSP for the card front.  A 1 1/2" X 4" piece of Crushed Curry was textured with the Arrow Impressions folder, matted on Basic Black and added to the card.  I punched several small banners from a variety of DSPpatters from the DSP and added them below the Crushed Curry piece.  Tip:  Punch out banners from several pieces of cardstock and try a variety of patterns before adhering any to the card front.  I like to rotate from light to dark repeating some of the same patterns.  
The "You're How Old" sentiment from the Just Sayin' Stamp Set was stamped in Bermuda Bay and cut out with the Word Bubble framelit.  Tip:  Remember to stamp first and cut second, anytime you use the framelits around a stamped image. 

Here is a close up.  Aren't the details striking?


Card Details:
Stamp Set: Just Sayin' Bundle
Paper:  Kaleidoscope DSP, Crushed Curry, and Basic Black
Ink; Bermuda Bay
Tools:  Work Bubbles Framelits, Banner Punch, Arrow Impressions Texture Folder
Accessories:  Stampin' Dimensionals

Thanks for visiting!
Come back soon. 
Sherrie
Pin It! Read more at http://www.kevinandamanda.com/whatsnew/tutorials/add-a-pin-it-button-to-your-posts.html#ixzz2rT1AuL9L

Wednesday, February 5, 2014

Valentine Card

At Leadership in January, I participated in a swap with fellow Stampin' Pretty Pals.  One of the cards I received was made by Kindra Delaney, a fellow Stampin' Up demonstrator.  I really loved her design so I just had to CASE it.  
I used Real Red to make a standard card base.  The Pool Party Coordinations card front was textured with the Scallops Impression folder.  Then a heart was cut from the card front with one of framelits from the Hearts Collection.  The sentiment was stamped on a piece of Whisper White cardstock and added to the card base. The Pool Party card front was added to the card base over the Whisper White with dimensionals.  I used the Small Heart punch to out several hearts from the Fresh Prints paper stack and Red Glimmer Paper.  They were added to the frame of the heart with glue dots.   


Card Details
Stamp Set:  Perfect Pennants
Paper:  Pool Party Coordinations, Real Red and Whisper White cardstock, Red Glimmer Paper
Ink:  Staz'On Black and Real Red
Tools:  Hearts Collection Framelits, Small Heart Punch, and Scallop Impressions Texture folder.
Accessories:  Small glue dots

Thanks for visiting!
Come back soon. 
Sherrie
Pin It! Read more at http://www.kevinandamanda.com/whatsnew/tutorials/add-a-pin-it-button-to-your-posts.html#ixzz2rT1AuL9L

Tuesday, February 4, 2014

Perfect Blend

Several months ago, I just had to have the Perfect Blend stamp set.   I started seeing cute samples online and could not wait to get the stamp set. But once I received it, it just sat on my shelf unused for 3 months.  Unfortunately, this is often the case of me being more of a collector.  I am always telling my stamping friends to use their products.  So in a effort to practice what I preach, it is my intention to use each and every Stampin' Up product I own to make samples in the coming weeks. So here we go.


The card base is a 8 1/2" X 5 1/2" piece of Crumb Cake cardstock scored at 4 1/4".  The card front is a 4" X 5 1/4" piece of Very Vanilla.  A coffee splatter was stamped with a stamp from the Gorgeous Grunge stamp set  in Baked Brown Sugar.  Pieces of Retro Fresh Washi Tape were added below the splatter and the sentiment was stamped in Early Expresso. 
I stamped the coffee cup once on Very Vanilla cardstock, then on Crumb Cake cardstock, and finally the band on two patterns from the Retro Fresh Designer Series Paper.  I snipped out the pieces to make the cup, lid and bands. They were adhered together.  A piece of Pool Party Baker's Twine was tied around the cups.  Then the cups were added with Stampin' Dimensionals.

Card Details:
Stamp Set:  Perfect Blend and Gorgeous Grunge
Paper:  Retro Fresh Designer Series Paper, Very Vanilla, and Crumb Cake
Ink:  Baked Brown Sugar, Early Expresso, and Black Staz' On
Accessories:  Retro Fresh Washi Tape, Pool Party Baker's Twine, and Stampin' Dimensionals.

Can't wait to use this set again.  

Thanks for visiting! 
Come back soon. 
Sherrie
Pin It! Read more at http://www.kevinandamanda.com/whatsnew/tutorials/add-a-pin-it-button-to-your-posts.html#ixzz2rT1AuL9L
Monday, February 3, 2014

Guest Stamper - Shirley Burnett

Last week at our Sassy Stampers meeting, we were all treated to this sweet little surprise made by Shirley Burnett.  She found the idea for the mouse in the Family Fun magazine, February 2013 issue.  She used Stampin' Up circle punches to get the swiss cheese effect.  I just love the "Mice to Know You!" message. 


Please share your comments.  I know Shirley would enjoy hearing from all of you.


Thanks for visiting!
Come back soon.
Sherrie
Pin It! Read more at http://www.kevinandamanda.com/whatsnew/tutorials/add-a-pin-it-button-to-your-posts.html#ixzz2rT1AuL9L

Sunday, February 2, 2014

Miss you already!

For today's card I used the Sweet Sorbet Designer Series Paper, which you can earn free with a $50 purchase during Sale-a-bration.  The colors are so sweet.  I had these two hearts left over from another card.  They were just sitting on my scrap table waiting for the right project.  Don't they look cute with Crisp Cantaloupe bows made from the Sweet Sorbet Accessories Pack.  This twine ties easily and is such a nice weight.  I really hope the twine will be available 
in the next Annual Catalog. Hint, hint Stampin' Up.  
The hearts are cut from Pool Party Coordinations, embossed with Scallops Texture folder, and sanded lightly.  I just love the worn look you get with the coordinations cardstock and texture folders. 


The card base is a 5 1/2" X 8 1/2" piece of Crisp Cantaloupe, which is scored at 4 1/4". The Sweet Sorbet 4" X 5 1/4" card front was adhered to the card base.  The hearts were added with Stampin' Dimensionals.  I stamped the sentiment from Just Sayin' Stamp Set in Basic Grey and cut it out with the matching Word Bubble framelits.  Pop the sentiment up with dimensionals and add a few Designer Rhinestones.  Ta-da! Sweet and simple card in under 10 minutes.

Card Details
Stamp Set:  Just Sayin'
Paper:  Sweet Sorbet DSP, Crisp Cantaloupe, Whisper White, and Pool Party Coordinations
Ink:  Basic Grey
Tools:  Wood Bubbles framelits, Hearts Collection framelits
Accessories:  Crisp Cantaloupe Twine, Designer Rhinestones, and Stampin' Dimensionals.


Thanks for visiting! 
Come back soon.
Sherrie
Pin It! Read more at http://www.kevinandamanda.com/whatsnew/tutorials/add-a-pin-it-button-to-your-posts.html#ixzz2rT1AuL9L